

How to Master Airport Traffic Patterns for Student Pilots


For student pilots, the thought of performing traffic patterns for the first time can be incredibly overwhelming. Not only do you have to memorize the pattern, but also focus on executing a smooth and safe landing. It's a lot to take in, but don't worry! This article will guide you through the process of learning how to fly a traffic pattern and make it feel like second nature.
Table of Contents
- Basics of Airport Traffic Patterns
- Traffic Pattern Altitudes and Speeds
- Visual Indicators and Wind Information
- Joining and Departing the Traffic Pattern
- Navigating Towered and Nontowered Airports
- Unconventional Traffic Patterns and Approaches
- Helicopter Traffic Patterns
- FAA Regulations and Certification Standards
- Frequently Asked Questions
- Takeaways
The Basics of Airport Traffic Patterns
If you have ever been to a major airport, you already have become familiar with the busy hubs of activity; airplanes are constantly taking off, landing, or taxiing.
To help pilots manage this a set of rules known as "airport traffic patterns" were created for maintaining order and ensuring safety for both those in the air and on the ground.
Traffic patterns are meant to help guide aircraft for landing, taxiing, or taking off, all important parts of safely directing aircraft into and out of an aerodrome.
Another important part of the process is learning how to properly communicate, traffic patterns require understanding the right terminology to use to express your intentions to both Air Traffic Control towers and to other aircraft in the vicinity.
You can find specific traffic pattern information, including the flight path, for each airport in Chart Supplements and the Aeronautical Information Manual (AIM).
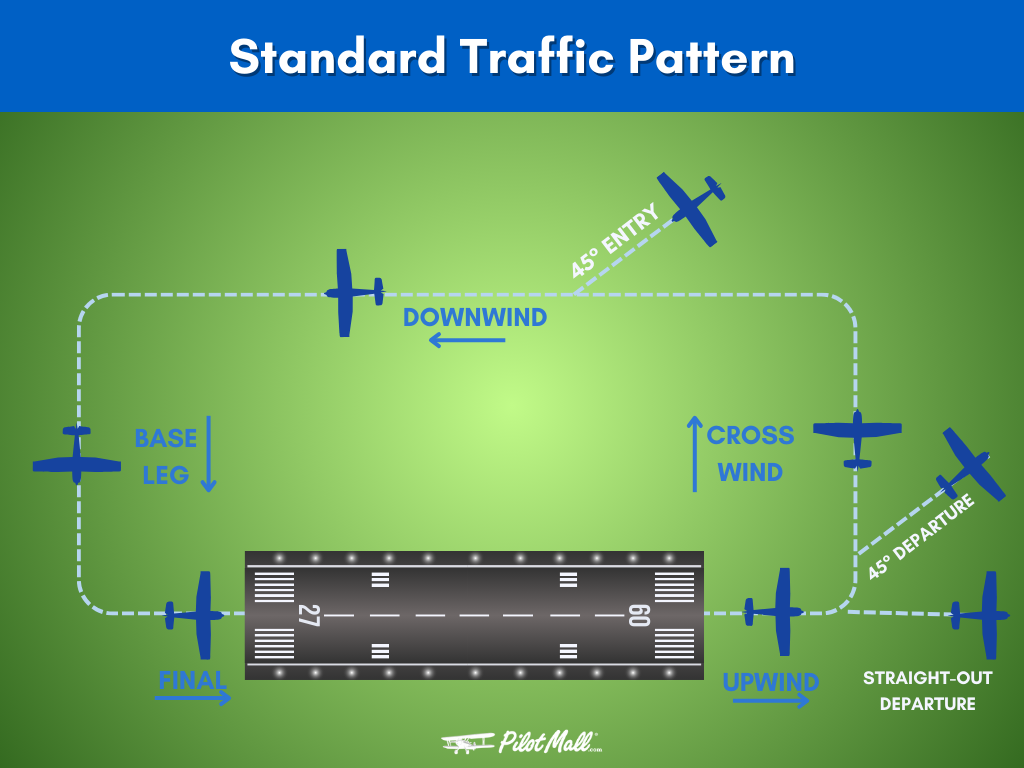
The standard pattern generally takes the form of a rectangular path consisting of:
- Upwind
- Crosswind
- Downwind
- Base
- Final
Usually, standard traffic patterns are left turns(but there are exceptions where right turns might be used). To help you better understand this, let’s break down these components and get deeper into each one.
Components of a Traffic Pattern
You will need to consult with your Certified Flight Instructor(CFI) about the proper speed and techniques to follow for the aircraft your training will be in. You can use this article as a guideline, but rely on the knowledge and experience of your flight instructor and official FAA resources to master the performance of these maneuvers.
The traffic pattern is comprised of a sequence that follows:
- The upwind leg: departing with a runway heading. This requires focusing on climbing and clearing any obstacles near the pattern.
- The crosswind leg: left turning from upwind, you can see the runway numbers out your left window. Here's where to focus on being at the right pattern altitude and maintaining the right speed.
- The downwind leg: left turn from the crosswind, and you can see that you're flying parallel to the runway. Once abeam the runway numbers you should be preparing your GUMPS check.
- The base leg: left turn from downwind, you should be setting up in preparation for landing once on the base leg.
- The final approach: the final approach requires making corrections to keep the aircraft centerline, maintaining your proper rate of descent, and watching to avoid a stall.
Example Radio Calls (Non-Towered) Per Leg:
"[Airport Name] Traffic, Cessna 123AB departing Runway [#], [climbing/turning] [Traffic leg], [Intentions, altitude], [Airport Name]"
When flying the downwind leg, you will need to maintain a steady speed and power.
Keep parallel to the runway, then apply crosswind correction, and begin your descent after passing the aiming point on the runway.
The base leg requires careful planning for wind conditions. What can happen here for most beginners is that they are either too low and slow or too high and fast.
You will need to adjust your ground track to remain perpendicular to the runway, preparing for speed reduction and flap adjustments as needed. This is where your CFI will help you understand how to "feel" the aircraft along with using your instruments for a successful landing.
The final approach is the culmination of these maneuvers, where pilots align their aircraft with the runway for landing. In this stage, wind conditions will dictate if you need to crab into the wind or where you will need to adjust the nose, with you turning earlier with a tailwind or later with a headwind for proper runway alignment.

Traffic Pattern Direction
In a standard traffic pattern, all turns are to the left, mimicking the flow of road traffic in countries like the United States, but exceptions exist.
The abbreviation ‘RP’ on the sectional aeronautical charts will show the runways that require right-hand traffic patterns at an airport without an operating control tower.
Right-hand traffic patterns can occur when the airport layout or local noise abatement procedures determine their use. In simple terms, there could be obstacles near the airport that would make a left-turn traffic pattern unsafe.
Right-hand traffic can also be found at airports with a parallel runway configuration, where one runway uses a normal left traffic pattern and the other uses a right-hand pattern to avoid aircraft crossing paths in flight.
Traffic Pattern Altitudes and Speeds
There are different types and sizes of aircrafts that potentially could be in the pattern depending on the airport you choose to land at.
Propeller-driven aircraft should enter a traffic pattern at an altitude of 1,000 feet above ground level (AGL), while large or turbine-powered aircraft do so at no less than 1,500 feet AGL, unless otherwise indicated.
While in the traffic pattern, pilots should:
- Maintain the recommended pattern altitude until abeam the numbers on the approach end of the landing runway on the downwind leg.
- Initiate descent abeam their aiming point. Before joining the traffic pattern, you will want to:
- Overfly the airfield(typically midfield) at an elevation +500-1000 feet above the standard traffic pattern altitude(to avoid traffic in the pattern). This gives you the opportunity to observe the traffic and slow down to the final approach speed while adding any remaining flaps during the landing sequence.
General Guidelines
Your speed is one of the most important parts of the traffic pattern process and will vary depending on the aircraft you fly. For instance, low-wing aircraft like Pipers will land and sink faster, while high-wing aircraft like Cessna's might want to float on final.
For propeller-driven aircraft like the Cessna 172, the recommended speeds are:
- Downwind speed: typically around 90 knots (check with your CFI and the operating manual for your aircraft)
- Base leg speed: 1.4 times the aircraft’s stall speed in landing configuration (Vso) as a general guideline
- Final approach speed: generally 1.3 times the Vso if there is no specific speed recommended by the aircraft manufacturer.
Keep in mind that these are general guidelines and will vary based on the specific aircraft model. For example, the manufacturer Cirrus tends to recommend a downwind speed of 100 knots, a base leg of 90 knots, and a final approach speed of 80-85 knots for the SR22T model.
Always refer to your aircraft’s operating manual or consult with your instructor for the most accurate and safe speeds to fly in the pattern.
Large and Turbine-Powered Aircraft
Large and turbine-powered aircraft operate at higher speeds and altitudes. This means they have unique considerations when it comes to traffic pattern altitudes and speeds. These aircraft should enter the traffic pattern at 2,000’ AGL. The regulation traffic pattern altitude for these airplanes at certain airports is 1,500′ AGL.
On takeoff, large or turbine-powered airplanes are required to climb to an altitude of 1,500′ above the surface before leveling off.
NOTE: If you're landing following a large faster aircraft, or helicopter, keep in mind that they can produce wake turbulence.

Visual Indicators and Wind Information
Visual indicators like windsock are incredibly helpful in providing pilots with a visual representation of wind direction and speed. The sock points opposite to where the wind is originating. Meaning, you want to take off or land at the runway the end of the sock is pointing at for a good headwind.
Windsocks have several features that make them useful for measuring wind speed. They:
- Reflect wind speed through their angle of extension from the mounting pole. They hang limp in light winds and extend horizontally in strong winds
- Are usually colored in high-visibility shades like white, yellow, or orange.
- Traditionally featured alternating stripes to estimate wind speed, where each stripe represented an increment of 3 knots.
- They help a pilot determine if there is a crosswind on the runway as well.
International standards require windsocks to rotate freely and accurately represent the true wind direction within a five-degree margin of error. To help enhance their visibility at night, they are either floodlit or can have an internal light mounted on the pole.
Joining and Departing the Traffic Pattern
Joining and departing the traffic pattern might seem like a straightforward process, but it requires a lot of attention, focus, and precision. When entering the traffic pattern, you should execute all turns to the left unless otherwise indicated, with an exception applicable to helicopters.
If you or another aircraft need to initiate a go-around, pilots are expected to avoid disrupting the flow of arriving and departing traffic and maintain safe separation.
Let's look at this process more closely.
Entering the Traffic Pattern
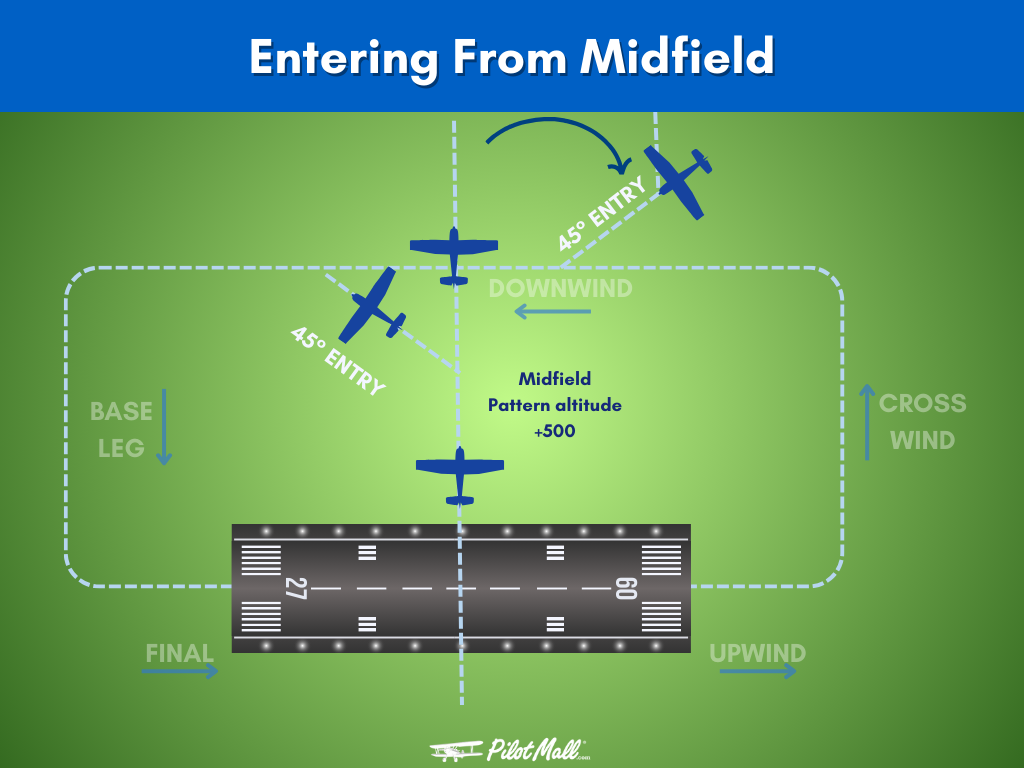
To join the traffic pattern, you enter at a 45-degree angle to the downwind leg, aiming toward the midpoint of the runway, at pattern altitude. This approach will provide you with better visibility of any air traffic within the pattern.
Executing a 45-degree pattern entry involves these steps:
- Use the heading indicator to plan a path that intersects the downwind leg at a 45-degree angle.
- Take into account wind conditions and adjust your heading accordingly.
- Identify the correct midpoint entry point on the downwind leg.
- Begin your descent and enter the traffic pattern at the designated entry point.
Midfield entries include leveling off at pattern altitude, abeam the runway midpoint, or crossing midfield at an altitude at least 500 feet above the pattern before entering the downwind leg. Congested patterns will require special caution or alternative entry methods.
Before entering the traffic pattern, you should fly over the airport 500-1000 feet above pattern altitude to observe traffic, determine wind direction, and note any runway obstructions and conditions.
Example Radio Call (Non-Towered):
"Siler City Traffic, Cessna 123AB entering left downwind for Runway 18, [full stop/ touch and go], Siler City."
Example Radio Call Midfield Entry (Non-Towered):
"Siler City Traffic, Cessna 123AB crossing midfield to enter left downwind for Runway 18, [full stop/ touch and go], Siler City"
NOTE: At towered airports, ATC may advise you on how to enter into the traffic pattern or issue you a straight in to final, follow all directions given.
Departing the Traffic Pattern
Departing the traffic pattern is just as important as entering it, and it comes with its own set of procedures.
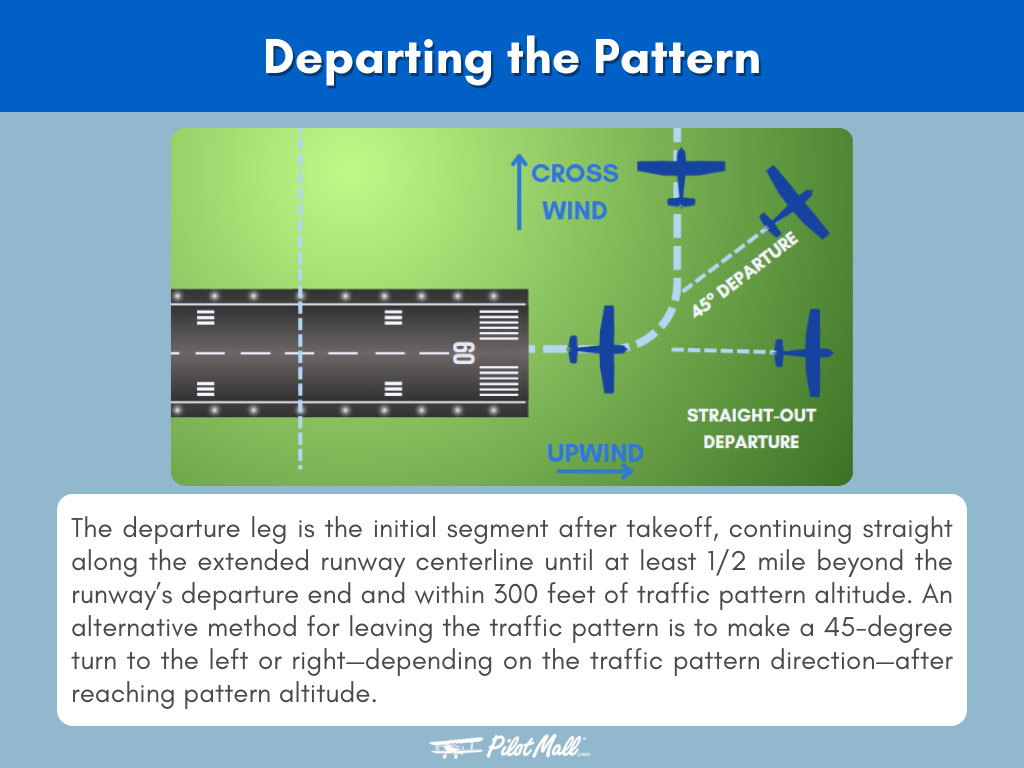
The departure leg is the initial segment after takeoff, continuing straight along the extended runway centerline until at least 1/2 mile beyond the runway’s departure end and within 300 feet of traffic pattern altitude.
If you intend to leave the traffic pattern immediately after takeoff you should continue straight ahead beyond the departure end of the runway, maintaining a flight path parallel to the runway, before initiating the exit.
Example Radio Call (Non-Towered):
"Siler City Traffic, Cessna 123AB departing Runway 18, southbound departure, climbing to 3,500 feet, Siler City Traffic."
An alternative method for leaving the traffic pattern is to make a 45-degree turn to the left or right, depending on the traffic pattern direction, after reaching pattern altitude.
At non-towered airports, you should ascend to traffic pattern altitude before departing the pattern, opting for either the 45-degree turn in the traffic pattern direction or climbing straight out. Make sure to state your intention to leave the traffic pattern and the direction you will head if you are at a non-towered airport.
Navigating Towered and Non-towered Airports
At towered airports, pilots are responsible for obtaining clearance from Air Traffic Control (ATC) before approaching or departing the airport.
When operating at non-towered airports, pilots must be self-reliant, maintain situational awareness, and communicate their intentions to any traffic in their local area without air traffic control.
Communication and Clearance at Towered Airports
As a pilot, you must initiate communication with air traffic control when you are approximately 10 miles from the towered airport and provide the following pieces of information:
- The facility being contacted
- Your aircraft's identification
- Your location
Example Radio Call:
"Palm Beach Tower, this is Cessna 123AB approximately 10 miles southeast at 3,000FT inbound for [landing/touch and go], [additional information as required], over."
Certain operations, such as touch-and-go landings at a towered airport, require clearance from Air Traffic Control (ATC).
In the event of a transmitter or receiver failure, be prepared to communicate using light signals and follow specific procedures if the receiver is inoperative to advise the tower of your position and intentions.
Approaching Non-towered Airports
If you are approaching a non-towered airport, you need to state your intention before getting near the traffic pattern.
You will need to first:
- Make an initial radio communication when you are 10 miles away from a non-towered airport, following the Aeronautical Information Manual.
- Avoid flying through the traffic pattern.
- Check the ATIS and get wind and landing direction indicators while flying at an altitude above the traffic pattern.
Unconventional Traffic Patterns and Approaches
In some situations, unconventional traffic patterns and approaches might be used to meet specific conditions.
Contra-rotating circuits are used at some airports to reduce the noise impact on nearby communities by alternating the direction of the circuit. The implementation of contra-rotating circuits needs clear communication with pilots and air traffic control to avoid potential conflicts.
Straight-in approaches can expedite landings and reduce time in the pattern, especially at non-towered airports. You must be clear with your intentions and scan carefully for traffic if you want to execute a straight-in approach.
Helicopter Traffic Patterns
Helicopters, since they can hover, ascend, and descend vertically, have a distinct traffic pattern. They generally fly traffic patterns similar to fixed-wing aircraft but at a reduced altitude of 500 feet AGL and closer to the runway to ensure separation and safety.
Right-hand traffic patterns are typical for helicopter pilots, because they have improved visibility from the right seat position.
The helicopter traffic pattern size and shape can be adjusted to match the performance characteristics of the aircraft.
NOTE: Helicopters can produce rotor downwash, which can affect smaller fixed-wing traffic landing behind the helicopter. Take caution and issue a go-around to avoid dangerous wake turbulence.
FAA Regulations and Certification Standards
The Federal Aviation Administration (FAA) outlines specific regulations for the operation of traffic patterns at airports.
You can brush up on these regulations to help with learning about flying in an airport traffic pattern by reading:
- Advisory Circular AC 90-66C
- Right-of-way rules: 14 CFR 91.113
- Class G Airspace: 14 CFR 91.126
- Class E Airspace: 14 CFR 91.127
- Class D Airspace: 14 CFR 91.129
- Class C Airspace: 14 CFR 91.130
- Class B Airspace: 14 CFR 91.131
- Aeronautical Information Manual (AIM) sections 4-3-3 and 4-3-5

Frequently Asked Questions
-
What is the standard traffic pattern at the airport?
The standard traffic pattern at the airport is a left-hand pattern, with all turns made to the left unless otherwise indicated by visual markings or published documentation. This pattern includes an upwind, crosswind, downwind, and final approach leg.
-
What is the traffic pattern indicator in the airport?
The traffic pattern indicator at the airport is typically an L-shaped marker displayed with a segmented circle near the runway, with the short member indicating the direction for traffic pattern turns. This helps pilots figure out the proper traffic flow when using parallel runways.
-
How do you fly an airport traffic pattern?
To fly an airport traffic pattern flawlessly, make a radio call 10 miles out, overfly 500-1000 feet above traffic pattern altitude, enter the pattern at a 45-degree angle to the downwind leg, fly downwind, reduce power, descend, and turn base and final.
-
What are traffic patterns in aviation?
Airport traffic patterns in aviation are rectangular flight paths that improve traffic flow and provide safety when properly executed, with most mid-air collisions occurring during the final approach leg.
-
What are contra-rotating circuits?
Contra-rotating circuits are used at some airports to reduce noise impact on nearby communities by alternating the direction of the circuit. This helps in distributing the noise over a wider area and reducing the impact on any one community.
Takeaways
We know that this guide had a lot of information to take in, don’t be afraid to print out this article and take it to your CFI to help clarify anything that is misunderstood. Only official sources will keep up to date on exactly what you need to know.
By this point you now know that airport traffic patterns mimic invisible highways, guiding pilots to safely navigate the airspace around airports. We’ve also explored the differences between operating at towered and nontowered airports, uncovered unconventional traffic patterns, and went into the unique patterns of helicopters.
Remember, each flight is a fresh opportunity to learn more and to perfect your skills.
 |
ASA 2025 FAR/AIMThe 2024 ASA FAR/AIM Book keeps you up to date with the latest rules and procedures in aviation. You'll find the complete and current text of the Federal Aviation Regulations (FARs), covering a wide range of topics including pilot certification, aircraft operations, airspace regulations, and more. |

Want to learn about flight maneuvers?
Our guides are designed to help student pilots become professional pilots and for private pilots to brush up on their knowledge and skills.
- Understanding the Slow Flight Technique
- How To Fly Turns Around A Point (Complete Guide + Lesson Plan)
- Conquer Steep Turns and Rule the Skies (Step by Step)
Did you find this article helpful?
Do you think we missed anything important? Let us know in the comments below!


