

How to Land a Plane Safely Step-By-Step (Video)
There are certain skills that professionals pull off with grace and finesse making them seem deceptively easy to the untrained eye. Landing an aircraft is one of those skills. It may look easy, but we all know the saying, “A good landing is one you can walk away from. A great landing is one after which you can use the aircraft again.” Clearly it isn’t quite so easy, is it?


Some professionals have the ability to perform certain skills with such ease and smoothness that they appear effortless to those who are not trained in the same field. Landing an aircraft is one of those skills. It may seem like a simple task, but as the saying goes,
"A good landing is one you can walk away from. A great landing is one after which you can use the aircraft again."
Clearly, it requires more skill and precision than meets the eye. In fact, mastering the landing phase is crucial in aviation because almost half of all accidents involve mistakes during this phase.
Today, we will go over a step-by-step guide on how to land a plane, including important tips and tricks to ensure safety and success.
5 Phases of a Normal Landing
The mistakes of others provide good learning lessons, so we will go over common landing errors and how to prevent them. Soon you too will be executing a series of great landings with flawless precision.
We recommend watching this video for further insight into perfecting your landings.

Let's start with a step-by-step high-level guide to the 5 phases of a normal approach and landing, that is to say a landing conducted on a long, firm runway during light winds with power available.
A normal landing can be broken down into 5 phases: base leg, final approach, roundout/flare, touchdown and after-landing roll.
Here’s how to ace each phase:
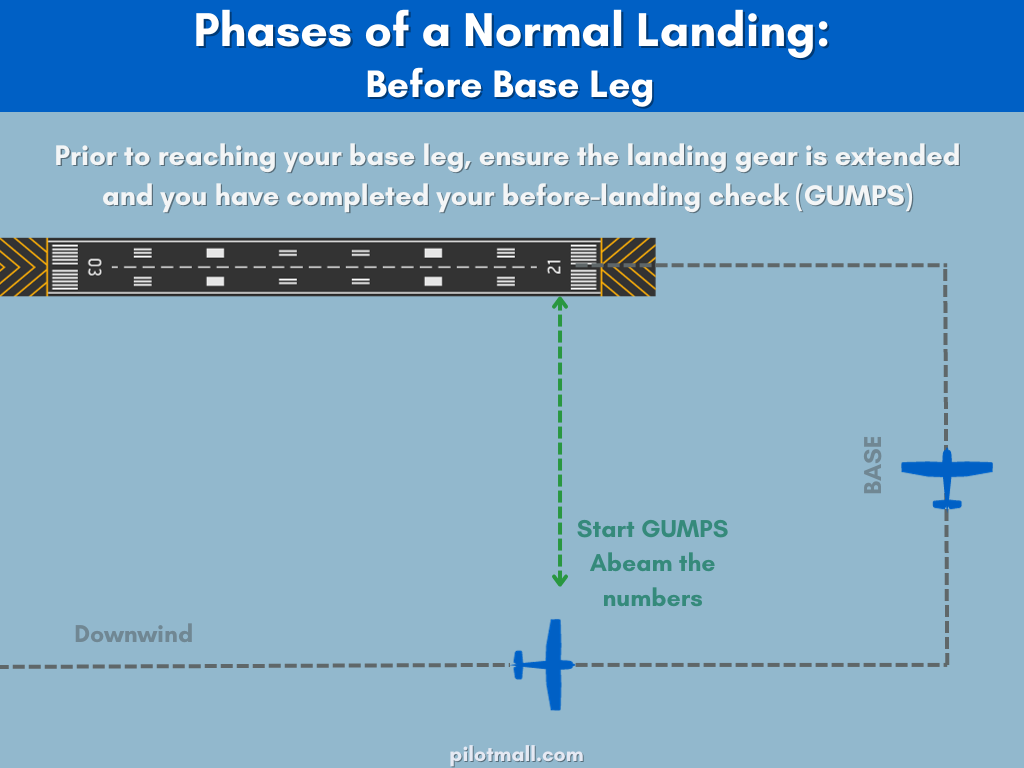
Base Leg
- Prior to reaching your base leg, ensure the landing gear is extended and you have completed your before-landing check (GUMPS).
- After turning onto the base leg, reduce power. Your airspeed at the start of the descent should be approximately 1.4 Vso.
- Extend flaps as needed, waiting until final approach for full flap extension.
- Establish and maintain drift correction to follow a ground track perpendicular to the extension of the centerline of the runway.
- Continue your base leg to the point where a medium to shallow-banked turn (no more than 30°) will align the flight path with the centerline of the runway. It is critical to avoid losing airspeed or overbanking here as that has caused many stall accidents. If you overshoot, do a go-around and make another attempt.
- Ensure that the altitude of your base-to-final turn allows you to clear terrain and obstructions.

Final Approach
- When you complete your base-to-final turn, you should be lined up with the runway centerline.
- For a normal approach with no wind drift, keep the longitudinal axis of your aircraft aligned with the runway centerline. Use your rudders.
- Once aligned, extend flaps to final setting. Adjust pitch attitude for desired rate of descent, making slight adjustments to pitch and power in order to maintain descent attitude and target airspeed. Airspeed should be 1.3 Vso unless otherwise specified by the aircraft manufacturer.
- Once pitch attitude and airspeed are stabilized, relieve control pressure by retrimming.
- Control descent angle (using power and pitch adjustments) so that the airplane lands on the centerline in the first third of the runway. At this point you should be looking down the runway and using your peripheral vision to help you gauge your sink rate.
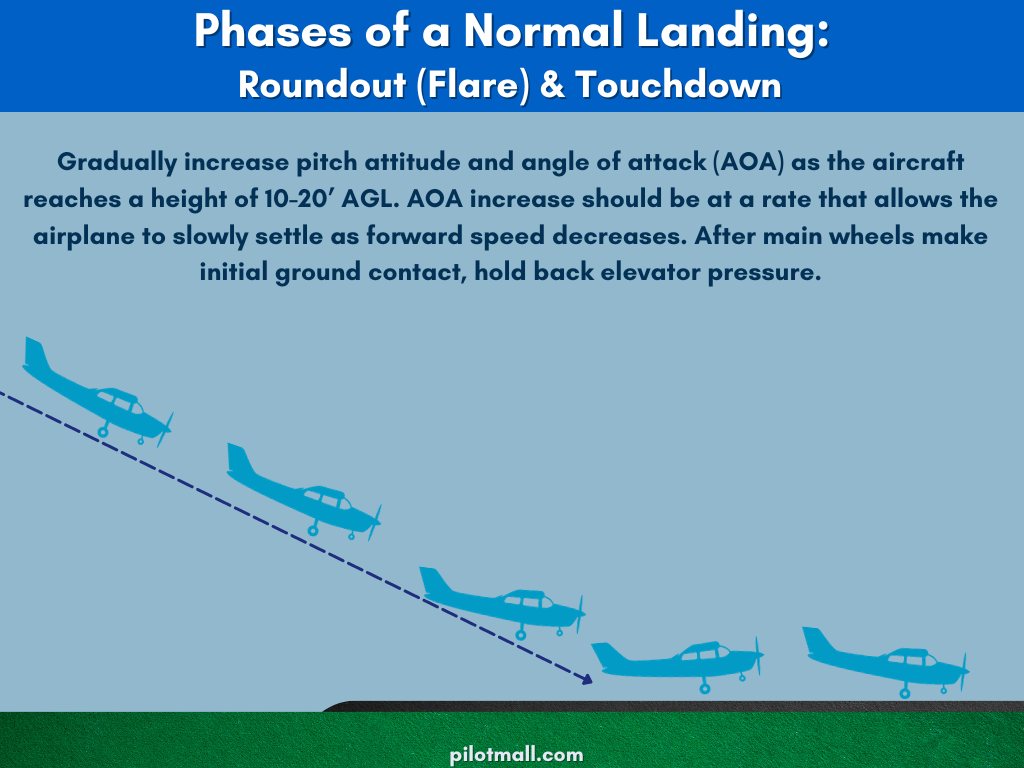
Roundout (Flare)
- Gradually increase pitch attitude and angle of attack (AOA) as the aircraft reaches a height of 10-20’ AGL. AOA increase should be at a rate that allows the airplane to slowly settle as forward speed decreases.
- Sync roundout rate with the rate of closure to the ground.
- Do not push elevator control forward once you have started the roundout maneuver.
Touchdown
- After main wheels make initial ground contact, hold back elevator pressure. This maintains a positive AOA, holds nose wheel off ground until aircraft has decelerated and provides for aerodynamic braking.
- Touchdown with the airplane parallel to the direction of movement along the runway. Any sideways landings put unnecessary and potentially dangerous side loads on the landing gear.
After Landing Roll
- Once your plane has landed, your focus should be on directional control and deceleration.
- Be alert and prepared to respond to any directional control difficulties that can be caused by ground friction on wheels. Use rudder, nose wheel steering, brakes and ailerons to maintain directional control.
- Having established directional control and confirmed nose wheel is on the ground, apply brakes. Apply with a force just short of causing skidding.
Common Landing Errors/Problems
Now that we know how a landing is supposed to look, it’s time to find out what can, and too often does, go wrong. We will review some of the common landing errors and problems, then share what you can do to decrease your likelihood of them happening to you.
Undershooting the Runway
Let’s take a look at what causes undershooting the runway.
- Flying too far away from the runway / pattern too wide
- Turning late on your downwind leg
- Failure to maintain adequate power on final
Poor pattern techniques such as flying too wide, flying too far away from the runway or turning too late on your downwind will get you into this situation. In any case, somewhere along the line you’ve made a miscalculation and now you notice that you will not make the runway with your current glideslope.
An answer for a lot of pilots is to try to carry the plane to the numbers which means they will pitch or ease the nose up without adding power. This technique will only get them closer to stalling and not closer to the airport. When you’re set up on final, remember the saying “pitch controls airspeed, power controls altitude”.
One way to set yourself up for success is by placing the runway centerline on a very specific part of the aircraft.
You’ll be able to look out the window on your downwind and gauge your distance from the runway. Some pilots even put a strip of tape at either the leading edge (on low-wing aircraft) or the wing strut (on high-wing aircraft) as a gauge.
This will take care of the problem of wide or narrow patterns. If you cannot use tape, then practice your patterns until you select the spot on the wing that corresponds to that perfect runway pattern and commit that spot to memory.
Make Your Downwind-to-Base Turn the Same Point
Another way to help avoid the undershoot is to make your downwind to base turn at exactly the same point every time. When there is not a traffic issue, turn base when your landing spot is 45° behind the wing. This will keep you in the box.
When you are at familiar airports, you can use familiar landmarks such as houses, barns, intersections etc. but the 45° technique sets you up for success at any airport.
Some rules to remember:
- On your downwind fly no faster than the top of the flap operating range and no slower than 1.4 times calibrated stall speed for your aircraft at its actual landing weight (1.4 Vso).
- Maintain airspeed no lower than 1.4 Vso until after turning final.
- On final, let your airspeed decay to 1.3 Vso as you near the runway.
- If you encounter wind gusts, wind shear or turbulence, compensate with additional power on each segment of the approach.
Hard Landings
Hard landings cost money. These accidents result from several key causes.
- Distractions
- Looking ahead and losing perspective to the ground
- Improper scanning right before touchdown
- Ballooning
- Stretching Final
Distractions
As far as distractions go, adopt the standard that ATP pilots use - “sterile cockpit”. All conversations cease at a certain altitude or before entering a pattern, unless they pertain directly to aircraft operations.
Looking ahead instead of outside / Improper Scanning
When you are on short final start looking outside the aircraft, way outside. You’ll gain a good perspective on your sink rate that way.
Ballooning
This often results from too much airspeed and poor flare technique. Pulling back too much or too hard right before landing will get you back up in the air, for a moment, anyway. If this happens to you, ease the nose over gently and add some power if necessary. Remember those go-arounds, they are your friend. A go-around may be a lot easier on your wallet then a hard landing. A hard landing may very likely result in driving up the landing gear and turning that rental aircraft into a retractable.
Stretching Final
This situation is a result of you raising the nose without adding power. Remember to add power here to arrest that sink rate. Keep your wings level and remember to perform a go-around if you don’t like it.
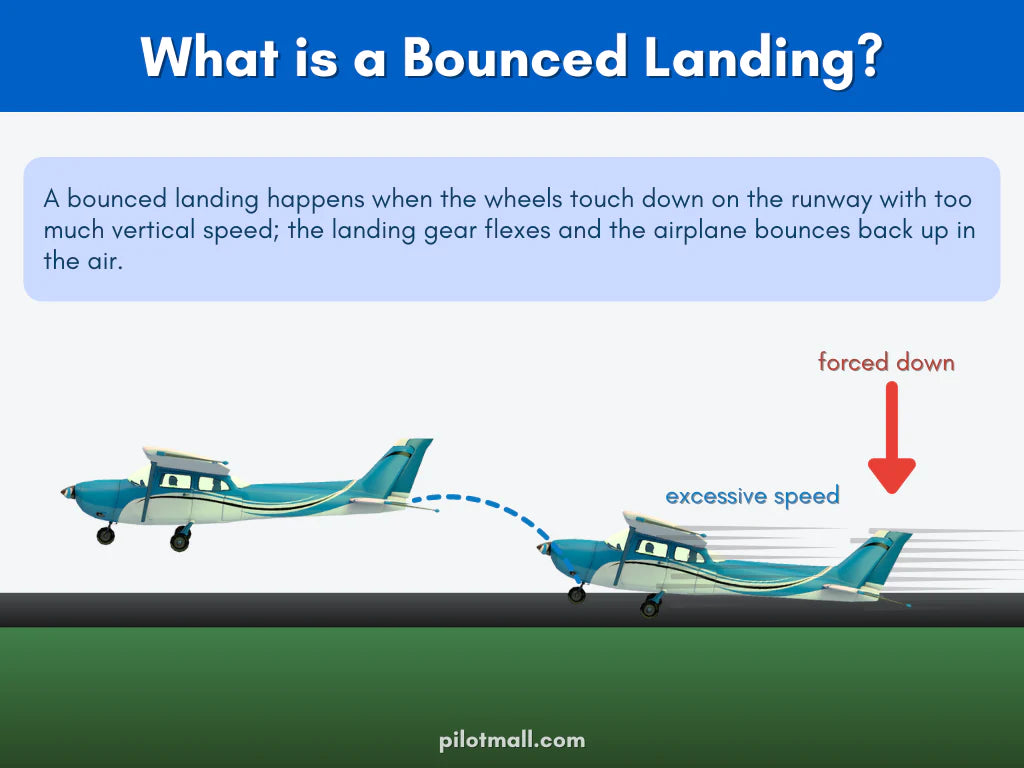
Bounced Landings
Bounced landings or porpoising is when the nose wheel or main gear (tail dragger) hits the ground first. This usually occurs because of poor attitude (of the aircraft, not you) at touchdown. The secret to good landings here is getting a feel for the proper attitude for the aircraft you are flying.
Too much airspeed (coming in too hot) is a root cause for many pilots. With the airplane still flying, the pilot wants to force it to the ground.
What to do after you bounce:
- Ease nose over
- Re-land the aircraft, this time holding proper pitch attitude
- Hold back pressure, bleed off airspeed, land it gently
To avoid porpoising:
- Trim the aircraft for a stabilized approach
- Avoid excess airspeed
- Avoid distractions
- Maintain proper pitch attitude (don’t force it down)
- Stay proficient
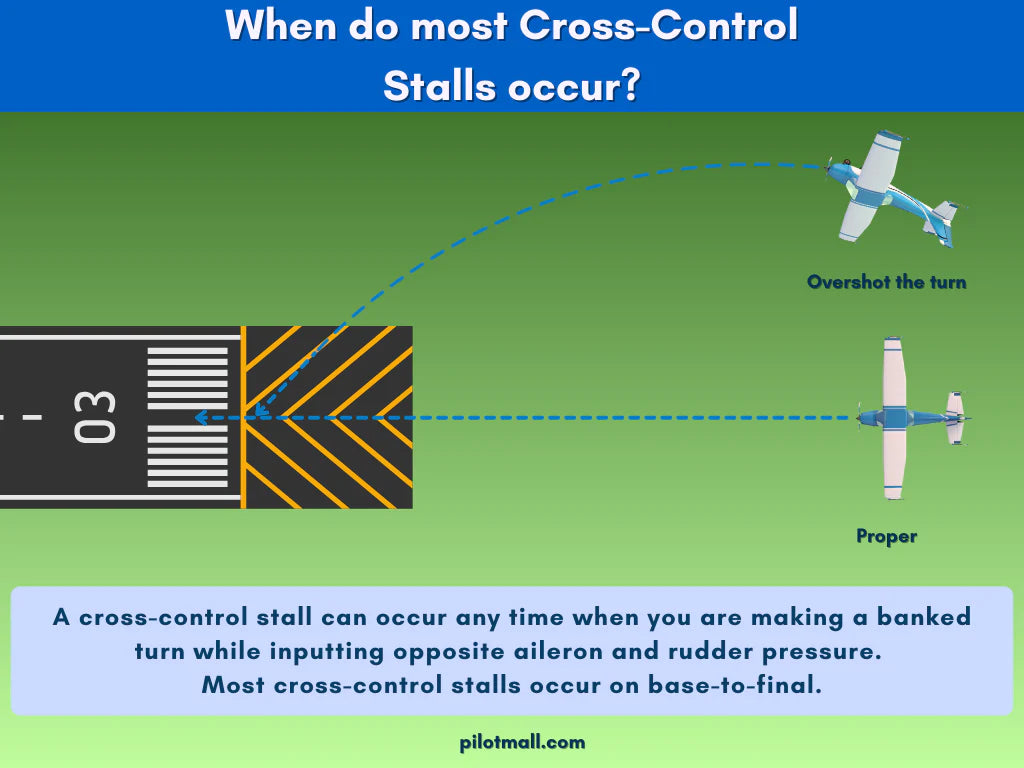
The Cross-Control Stall
Stalls are still a frequent cause of landing accidents and the deadliest of all is the cross-control stall.
A cross-control stall is usually set up on the base leg. It has a propensity to become even greater if there is tailwind on that leg. The tailwind will give you less time to react. Now, add a distraction or two like a lot of traffic in the pattern or busy radio traffic and you may get yourself into this jam really quick.
When making your turn to final you already have drilled in your head to keep your turns to 30° or less. So when you overshoot your turn to final, you kick in some rudder instead while keeping your wings at 30°.
The nose then wants to drop so you ease the nose up a bit, the plane slows, your airspeed decays then bam, there’s the stall and only a few hundred feet off the ground. The outside wing is still flying while the inside wing has stalled. This causes you to roll to the inside wing and toward the ground.
This situation can be avoided. The number one thing to remember here is the go-around. It costs you nothing. Always be ready to abort. Do not fixate on making that landing, remember they are called approaches for a reason.
Good planning, good pattern discipline and being ready to do a go-around are what will keep you alive and out of the statistics pages.

Frequently Asked Questions
- What is the GUMPS check?
- GUMPS is a pre-landing checklist mnemonic used by pilots to ensure the aircraft is configured for landing. It stands for Gas, Undercarriage, Mixture, Propeller, and Seatbelts/Switches.
- What causes a bounced landing?
- Bounced landings usually occur due to poor attitude at touchdown or carrying too much airspeed, causing the pilot to force the plane onto the runway while it still wants to fly.
- What is the cross-control stall?
- A dangerous stall that often happens on the base-to-final turn when a pilot overshoots the runway centerline and tries to correct with excessive rudder and opposite aileron, increasing drag and stall risk at low altitude.
- How do I fix an undershoot on final approach?
- If you find yourself too low or slow, remember the adage "pitch controls airspeed, power controls altitude." Add power to arrest your sink rate rather than just pulling back on the yoke, which could lead to a stall.
Remember:
The safety of you, your passengers and your aircraft depends on your skills and ability to execute a safe, smooth landing. Know the steps to a normal landing, learn what can go wrong and practice, practice, practice.
Want to improve your landing technique?
Our guides are designed to help student pilots become professional pilots and for private pilots to brush up on their knowledge and skills.
- What’s a Cross-Control Stall? (Everything You Need to Know)
- Bounced Landing: How to Recover (& Avoid Porpoise Landings)
- Crosswind Landing: How to Perfect Your Technique in 3 Easy Steps
- Ground Effect: Learning to Use it To Your Advantage
- Power-Off Stall (13 Steps): Complete Recovery Procedure Guide
Did you find this article helpful?
Do you think we missed anything important or made a mistake? Let us know in the comments below!


